

How To Remove Otterbox Defender For Iphone 11
Updated date:
How to Put On and Remove OtterBox Defender from iPhone 7 and iPhone 7 Plus
Max holds a B.S. in mass communications from SIU, an M.A. in communications from U of I, and is pursuing an MBA from Webster University.
Introduction
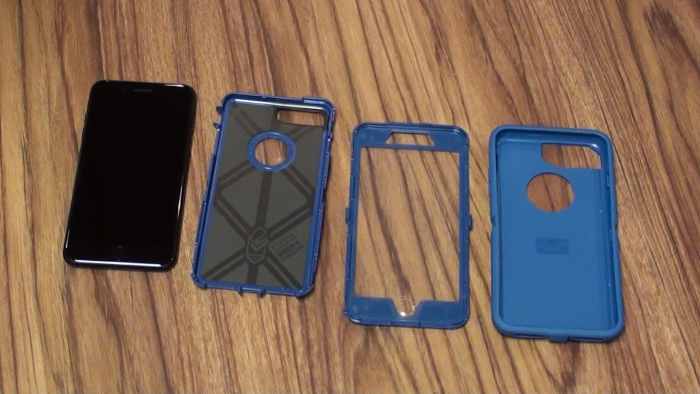
The OtterBox Defender case for the iPhone 7 and iPhone 7 Plus covers your phone with multiple levels of protects: a soft rubber shell on the outside, a hard plastic case inside of that, and a screen protector built into the hard plastic case. While all of this protection does add some bulk to your iPhone, it does protect your device most drops, and also does an excellent job keeping dust, lint, and other debris from finding its way inside of your device. Additionally, if you keep your iPhone 7 or iPhone 7 Plus wrapped up in the OtterBox Defender case while you own it, it should be in nearly perfect condition when you either sell it or trade it in toward another phone, which will help ensure you get the maximum value for your iPhone. Removing the OtterBox Defender case from your iPhone the first time can be tough, but it's important to be patient, and take care not to break any parts of the case. You may need a flat-head screwdriver to help with removing the outer shell and depressing the connectors on the hard plastic shell.
How to Remove OtterBox from iPhone 7 or iPhone 7 Plus
- Wedge your finger between the rubber shell and the hard plastic case, and then work your finger around the outer edge of your device to separate the rubber shell from the hard plastic shell. You may need to work a flat-head screwdriver in between the rubber outer shell and the hard plastic case and then move that around the edge of your iPhone to make it possible to eventually grab and remove the rubber shell.
- Remove the outer rubber shell from the hard plastic case.
- Locate the seven arrows on the back of your iPhone 7 or iPhone 7 Plus. These arrows point to the seven clips connecting the two pieces of the hard plastic case together. There are three clips along the left edge of the case, three clips along the right edge of the case, and one clip along the top edge of the case.
- Start with one of the clips at the bottom of one of the edges. Insert your fingernail or a flat-head screwdriver under the clip, and then slowly pull the clip out until you can get some separation between the two sides of the plastic case in that area. Be careful to not break the clips. Repeat this process until you've separated all seven connectors around the outer edge of the device.
- Lift and remove the top part of the hard plastic case, and then remove your iPhone from the lower part of the hard plastic case. You've successfully removed your iPhone 7 or iPhone 7 Plus from the OtterBox Defender case.

The OtterBox Defender on an iPhone 7 Plus.
Should I Update My Apple iPhone or iPad iOS Version?
How to Put OtterBox Defender On iPhone 7 or iPhone 7 Plus
- Place the iPhone 7 or iPhone 7 Plus inside of the back half of the hard plastic case. Ensure that the Apple logo on the back of your Phone can be seen through the window on the back of the hard plastic case.
- Line the front part of the hard plastic case up over your phone so that the hole in the top center of the front plastic case goes directly over the front-facing camera and the speaker for phone calls, and the hole for the home button at the bottom of the front plastic case goes directly over the home button.
- Reconnect the seven plastic connectors around the outer edge of the hard plastic case.
- Slide the bottom of the iPhone into the front, bottom part of the OtterBox Defender outer rubber shell, and then squeeze the rest of the iPhone into the rubber shell.
- Work around the outer edge of our iPhone, gently squeezing the outside of the OtterBox Defender's rubber shell to secure it against the hard plastic case. Also, push in the rubber covers for the vibrate switch and the Lightning port. You've now successfully put the OtterBox Defender case on your iPhone 7 or iPhone 7 Plus.
© 2017 Max Dalton
Related Articles
How To Remove Otterbox Defender For Iphone 11
Source: https://discover.hubpages.com/technology/Put-On-and-Remove-OtterBox-Defender-iPhone-7-and-iPhone-7-Plus
Posted by: elderwormse.blogspot.com
0 Response to "How To Remove Otterbox Defender For Iphone 11"
Post a Comment